
Overview
VMware recently released full support for Azure Active Directory (now called Entra ID) integration with vCenter with release 8.0 U2. Unfortunately, their documentation about integration had some major gaps, compelling us to write this guide.
VMware’s documents initially recommended opening your vCenter server URL to the public (which you should NEVER do). They’ve since added a note about tunneling that connection with no guidance on how to accomplish that. One option mentioned is using an application proxy in Azure, but this still publishes a public endpoint for vCenter web services. As an alternative, this guide utilizes the Microsoft Azure on-prem SCIM app INSTEAD of the VMware Identity Service app. This ensures all connectivity to vCenter is kept private using an Entra connector application. There is a bit more SCIM configuration required with this approach, but it is documented below and results in a much more secure setup.
Reference Articles
How to Enable Azure AD for vCenter Server (94182) (vmware.com)
Configure vCenter Server Identity Provider Federation for Azure AD (vmware.com)
vSphere 8.0 Update 2: Federated Authentication with Azure Active Directory | VMware
vCenter Authentication: AzureAD/Entra ID integration | vSphere 8 U2
Microsoft Entra on-premises application provisioning to SCIM-enabled apps
Name Mapping
| vCenter | Azure AD / Entra ID |
| Client Identifier | Application (client) ID |
| Shared secret | Client secret |
| OpenID Address | OpenID Connect metadata document |
Step 1 – vCenter – Configure Azure AD Identity Provider
- Navigate to Home > Administration > Single Sign On > Configuration
- Click Change Provider and select Azure AD
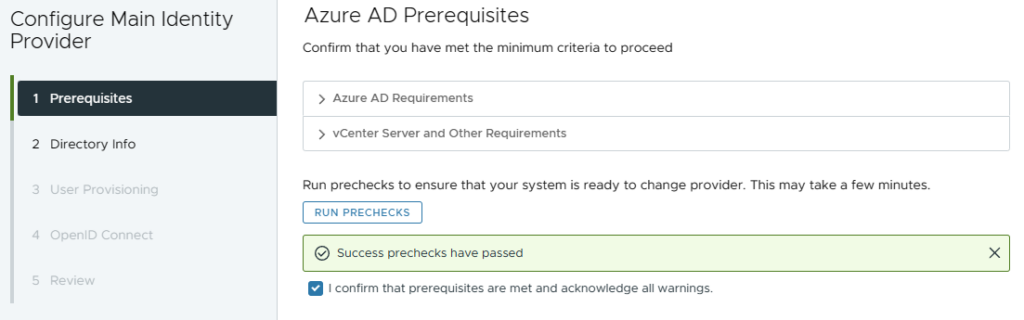
- Click Run Prechecks
- Check box to confirm > Next
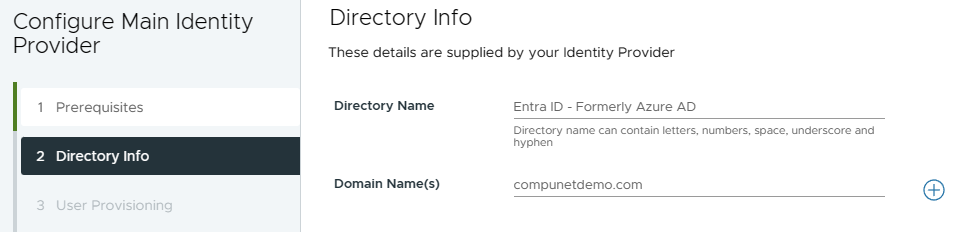
- Enter Directory Name
- e.g. Azure AD or Entra ID
- Enter your primary domain name and click the + button
- Most orgs only need one, but multiple can be added
- Click Next
- Set Token Lifespan to desired duration > Next
- Set a reminder to come back and generate a new token before this expires!

- Copy the Redirect URI for use in Azure later
- Enter an Identity Provider Name
- e.g. Azure AD or Entra ID
- This is what will be displayed on the login page for users to click
- Leave vCenter right here and open a new browser tab to complete Step 2 before returning
Step 2 – Create Azure Open ID Connect Enterprise App
- Select Home > Azure AD Directory > App Registration > New Registration
- Direct link
- Enter an appropriate name, ex: “vCenter Authentication”
- Under Redirect URI, select Web and paste the URL copied from vCenter in the first section
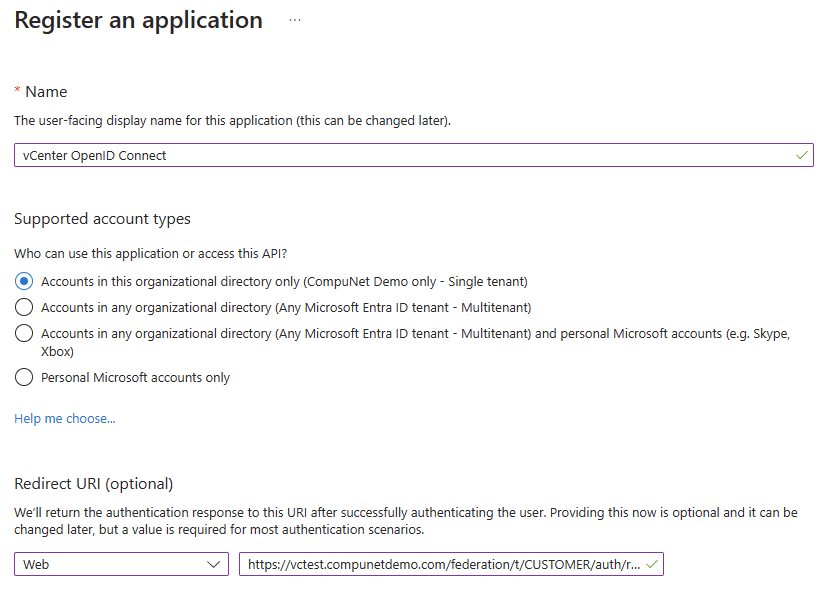
- Click Register
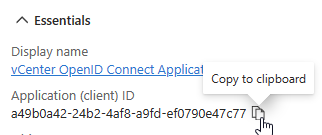
- In the newly created App Registration, copy the Application (client) ID
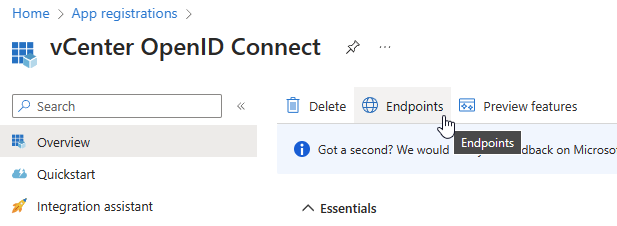
- Click Endpoints at the top
- Copy the OpenID Connect metadata document URL
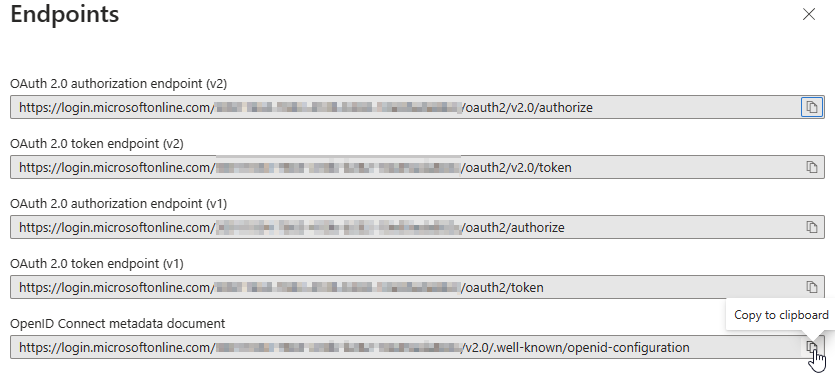
- Make sure the metadata URL contains your tenant ID, multi-tenant apps use a different endpoint that does not currently work in vCenter.
- X (close) out the Endpoints pop-out window
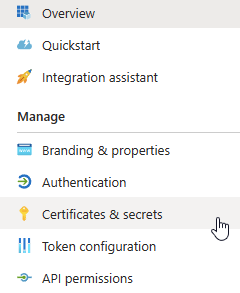
- Select Certificates & Secrets on the left
- Click + New client secret
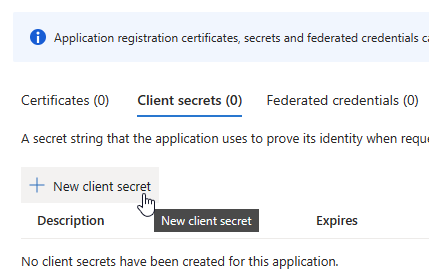
- Enter the name of your vCenter server in the Description
- Set an expiration date
- Consider using a timeframe that matches the Token Lifespan you selected in vCenter
- Set a Reminder!
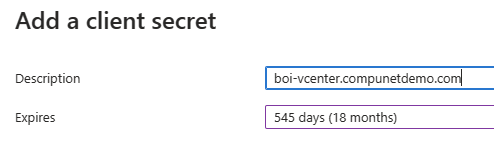
- Click Add
- Copy the Value of the new Client secret (Once you navigate away you will not be able to access this again)
Step 3 – vCenter – Complete Identity Provider Configuration
- Go back to the vCenter tab and paste the three remaining OpenID Connect values you copied from Step 2
- Client Identifier
- Shared Secret
- OpenID Address
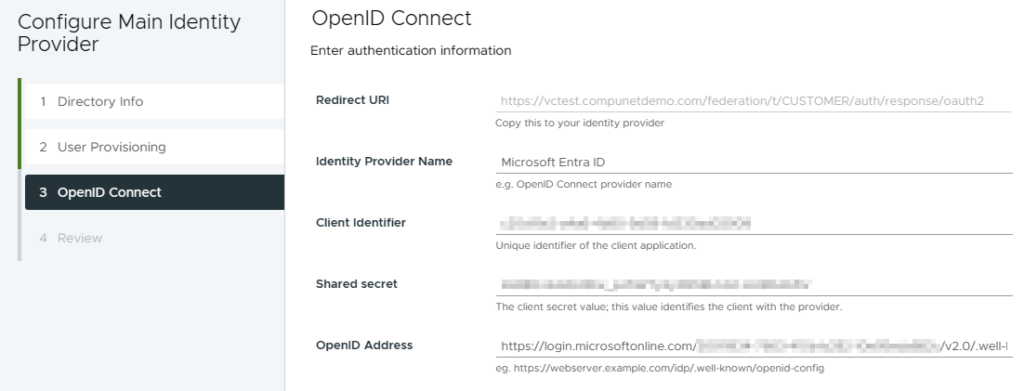
- Click Next
- Click Finish
Step 4 – Azure – Create SCIM Application
- This application is used to provision accounts into vCenter (The other application is used for authentication). This deviates from the VMWare instructions as we will use Entra’s on-premises SCIM connector to ensure private connectivity.
- Azure Entra Portal > Enterprise Applications > New Application > Search for On-premises SCIM app
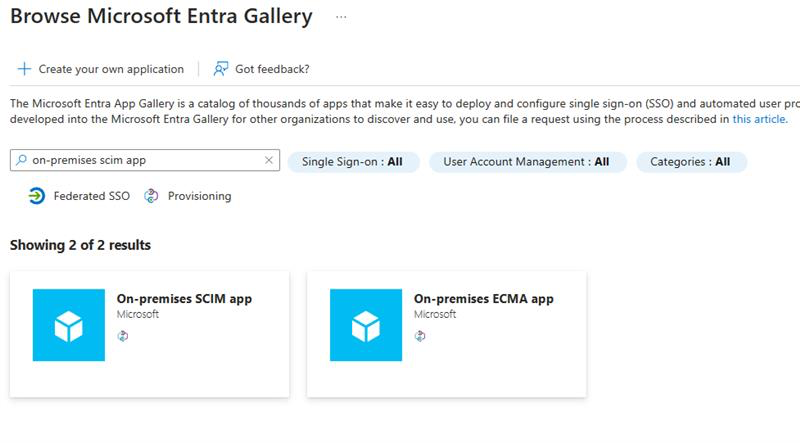
- Name the new app
- e.g. vCenter SCIM
- Click Create
- Open new app and browse to Provisioning blade
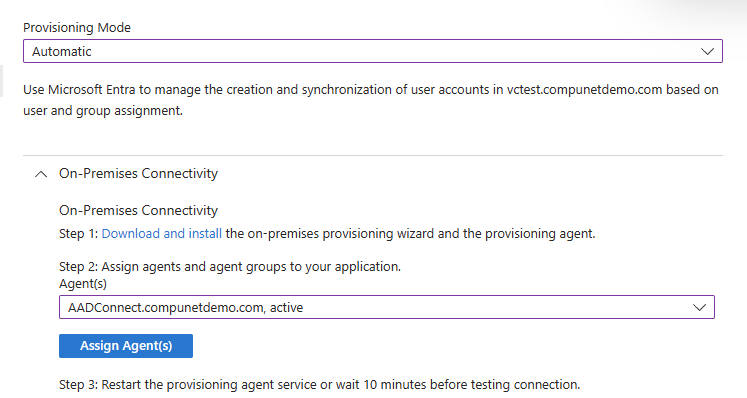
- Select Automatic mode
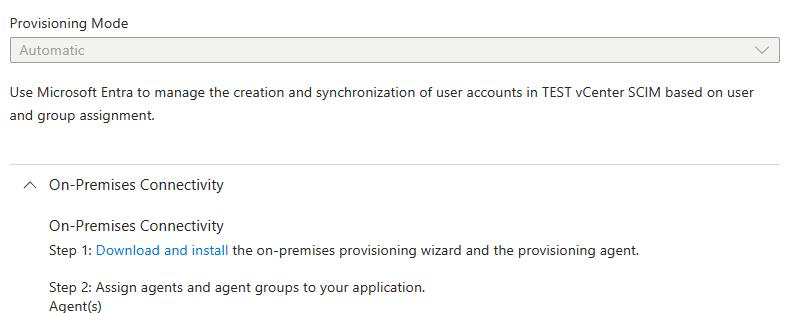
- Expand On-premises Connectivity and follow the instructions to download and install the provisioning agent in your environment
- https://learn.microsoft.com/en-us/entra/identity/app-provisioning/on-premises-scim-provisioning
- NOTE: If you do not see this section, you may have selected the wrong app, you must use the Microsoft published “on-premises SCIM App” instead of the VMWare app
- NOTE: The system where the agent is installed must trust the vCenter certificate. You may use a private cert, as long as it is in the local trust store.
- Once the SCIM provisioning agent is deployed you will be able to select and assign it
- Under Admin Credentials, provide the Tenant URL and Secret Token provided in your vCenter configuration
- This should be an internal DNS name accessible from the system where you installed the agent
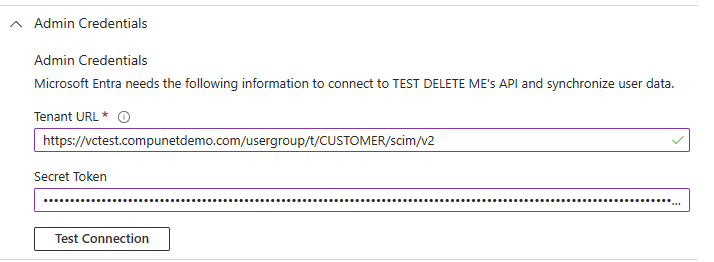
- Click Test Connection
- You may need to wait a bit or restart the agent for this to work
- Once test is successful, click Save at top of page
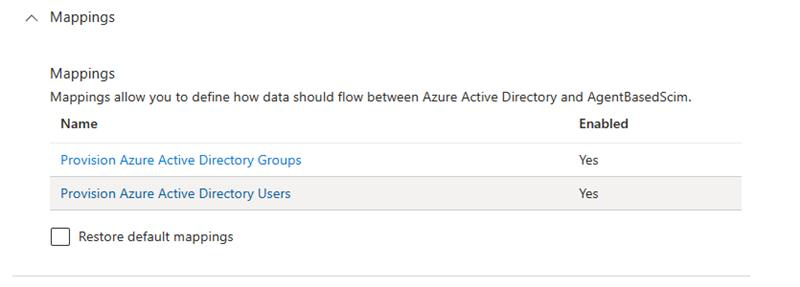
- A new Mappings section should appear, expand it
- Click Provision Azure Active Directory Users
- As we did not use the VMWare app, some settings need adjusted
- Scroll to the bottom of the page and check Show advanced options, then click Edit attribute list for AgentBasedScim

- Paste this new string value at the bottom: urn:ietf:params:scim:schemas:extension:ws1b:2.0:User:domain

- Click Save
- In Attribute Mapping click on the row containing the AgentBasedScim Attribute of externalID
- Change the Source attribute to objectId
- Change Match objects using this attribute to Yes
- Set Matching precedence to 1 (may already be set)
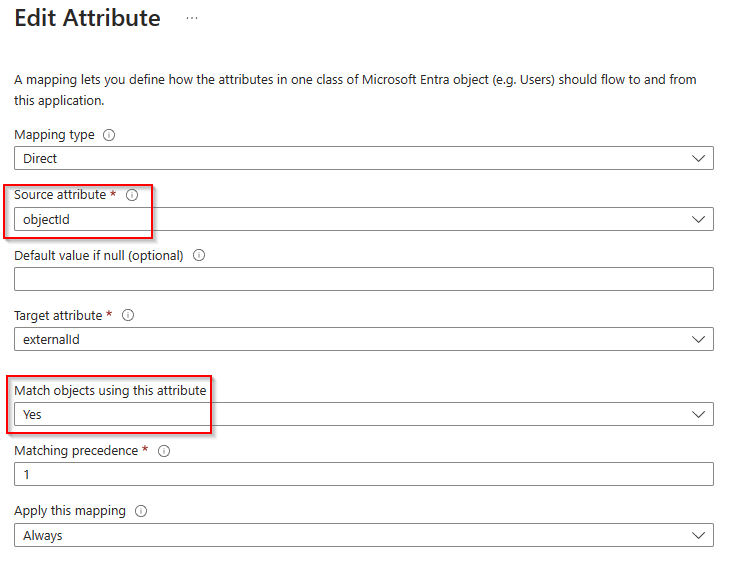
- Click OK
- In Attribute Mapping click on the row containing the AgentBasedScim Attribute of userName
- Change Mapping Type to Expression with this value: Item(Split([userPrincipalName], “@”), 1)
- Change Match objects using this attribute to No
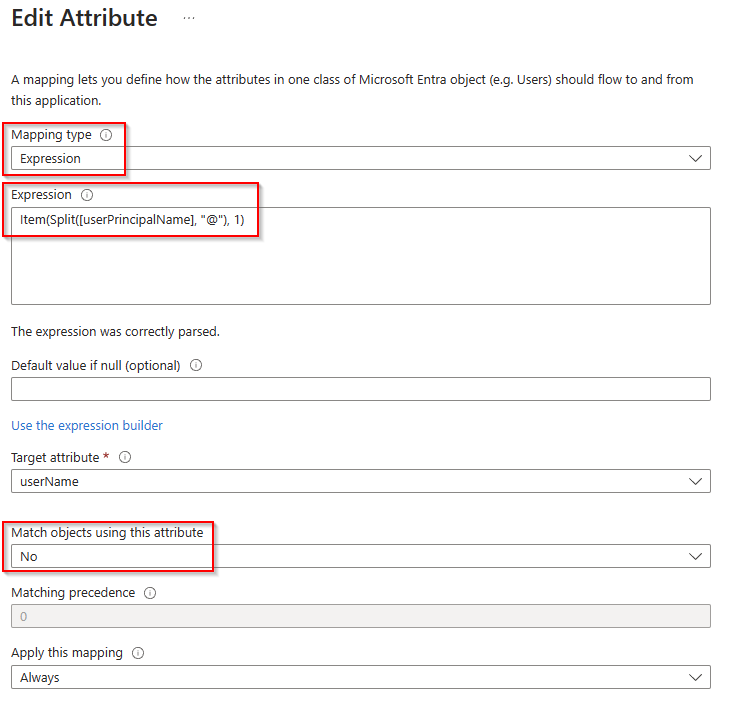
- Click OK
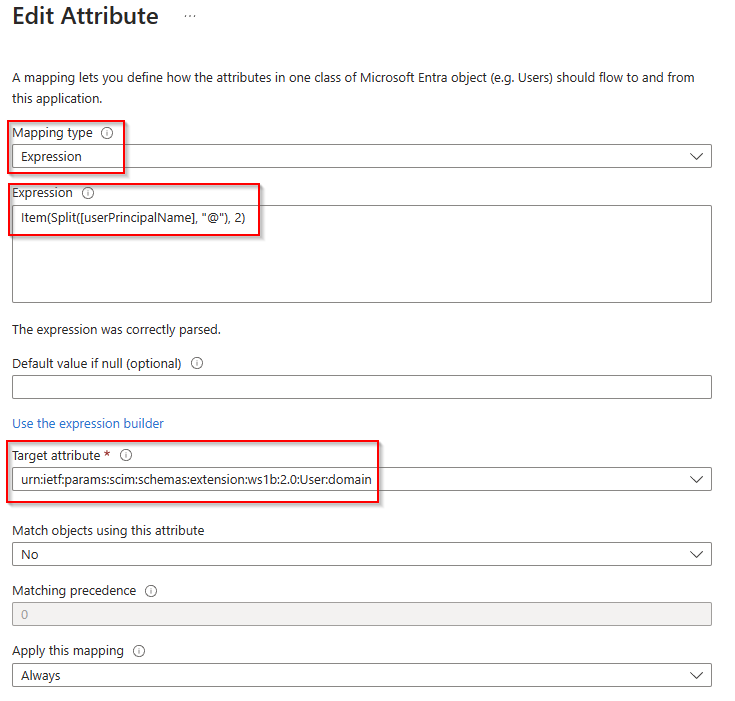
- Click Add New Mapping
- Set Mapping type to Expression with this value: Item(Split([userPrincipalName], “@”), 2)
- Set Target attribute to domain attribute we used previously: urn:ietf:params:scim:schemas:extension:ws1b:2.0:User:domain
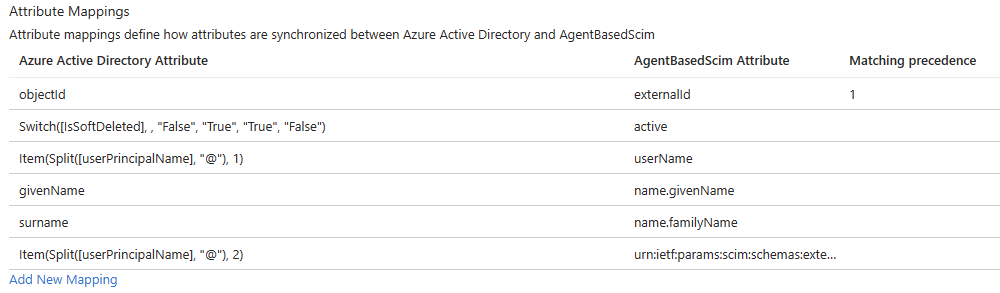
- Remove all mappings EXCEPT the following
- externalId
- active
- userName
- name.givenName
- name.familyName
- urn:ietf:params:scim:schemas:extension:ws1b:2.0:User:domain
- Click Save then X to close
- Select the Users and groups blade and add any users and groups you wish to assign to the application
- Members of groups will automatically be added
- Click to the Overview tab and click Start Provisioning, it may take some time to sync
- You can select Provision on demand to force an immediate sync of a few test users
Step 5 – vCenter – Configure Group Membership for Azure AD
- Navigate to Home > Administration > Single Sign On > Users and Groups
- Click the Groups tab
- Select the radio button next to Administrators then click Edit
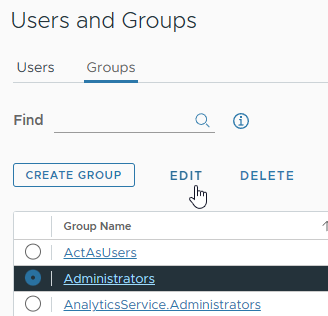
- Select your domain in the Add a member section
- Search for users or groups from your domain and click on each to add them
- Save
- That’s it! Now test logging in with Azure AD
Notes
- You can always login with the local administrator account (typically administrator@vsphere.local)
- Treat this as a ‘break glass’ account with a strong password that is unique and ONLY known to a select group of admins


